See Also
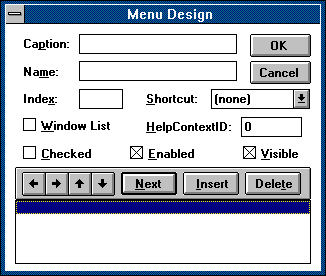
Use the Menu Design window to create custom menus for your application and to define their properties.
 To open the Menu Design window, select a form and then choose Menu Design from the Window menu.
The Menu Design window consists of:

A text box in which you enter the menu or command name that will appear on your menu bar or in your menu.
 To create a separator bar in your menu, type a single hyphen (-) here.
To give the user keyboard access to the menu item, insert an ampersand (&) before a letter. At run time, this letter is underlined, and the user can access the menu or command by pressing Alt and the letter. If you need an ampersand in the menu, put two consecutive ampersands in the caption.

A text box in which you enter a control name for the menu item. A control name is an identifier used only to access the menu item in code; it does not appear in a menu.

A text box in which you assign a numeric value that will determine the control's position within a control array. This position is not related to the screen position.

A drop-down list box from which you can select a shortcut key.

A check box you select if you want the menu control to contain a list of open MDI child forms in an MDI application.

A text box where you assign the unique numeric value for the context ID. This value is used to find the appropriate Help topic in the Help file identified by the HelpFile property.

A check box you select if you want a check mark to appear initially at the left of a menu item. This is generally used to indicate whether a toggle option is turned on or off.

A check box you select if you want the menu item to respond to events or to be unavailable and appear dimmed.

A check box where you indicate whether you want the menu item to appear on the menu.
A set of outlining keys that enable you to move menu items to a higher or lower level:

 Use these keys to change the level of a menu from a higher level to a lower level. You can create up to four levels of submenus.

 Use these keys to change the position of a menu item within the same menu level (up or down in the menu list).

A list box that displays a hierarchical list of menu items. Submenu items are indented to indicate their hierarchical position or level.
The Menu Design window also has the following buttons:
Button Description
Next Moves selection to the next line.
Insert Inserts a line in the list box before the currently selected line.
Delete Deletes the currently selected line.
OK Closes the Menu Design window and applies all menu changes to the last form you selected. The menu is available at design time but no events are generated.
Cancel Closes the Menu Design window and cancels all changes.
Help:
Creating a Menu Bar
Menu Design Window Keys
Learning Visual Basic:
Adding Menus
Programmer's Guide:
Chapter 4, "Menus and Dialogs"